
Save This Recipe! Enter your email and I'll send it straight to your inbox. Plus you'll get new recipes from me every week! By submitting this form, you consent to receive emails from Happy Healthy Mama.
My mission is to get the healthiest foods into my beloved family that I can. In order to do that, sometimes I need to get creative. I need to take cues from foods they like and figure out how I can create something similar with the foods I want them to eat.
Meghan likes pancakes? Why not make veggie pancakes? Tim has a serious need for chocolate? How about a low-sugar vegan chocolate pie?
This recipe took cues from Meghan and her love of crunchy foods like chips and crackers. Give that girl a cracker and she’ll be your best friend for life. All right, kid. You want crunch? You got it. Enter the crispy vegetable chips.
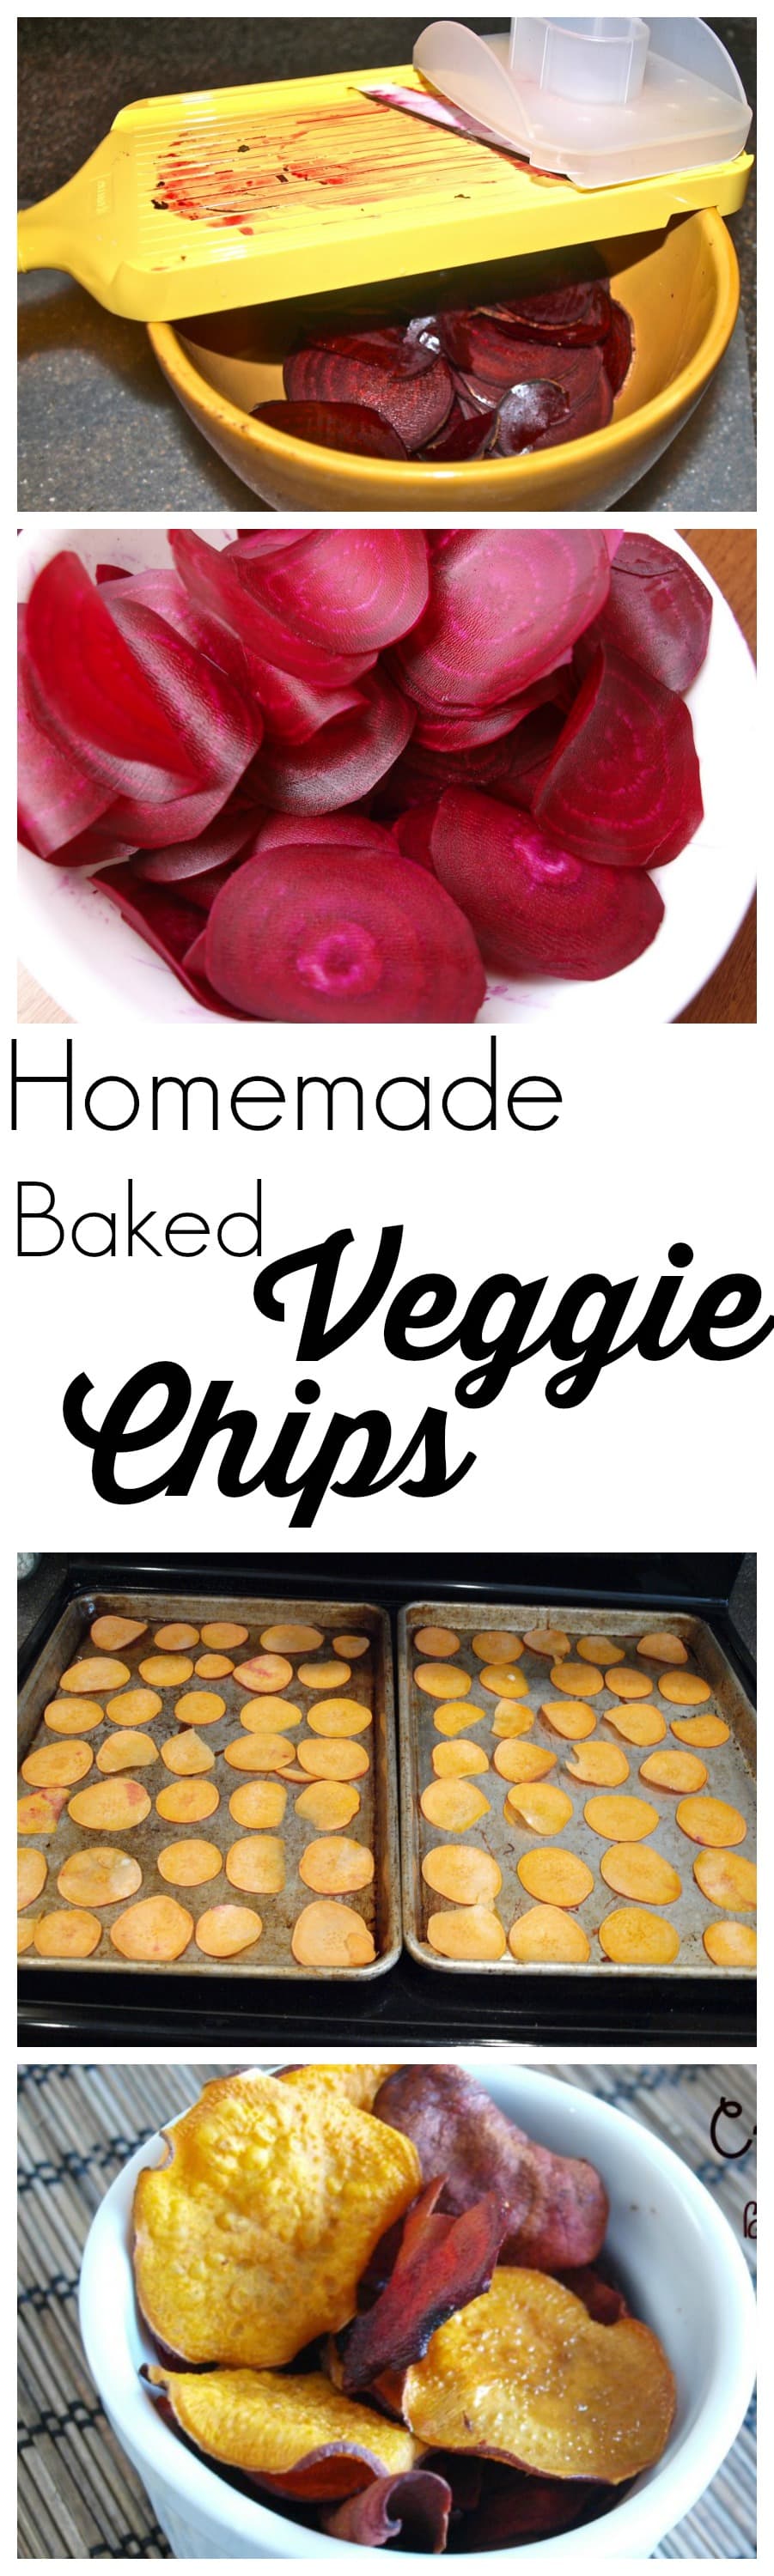
My first step in creating a vegetable chip that would pass the Meghan test was buying a mandoline. I didn’t get all fancy, but just a standard $20 version. Let me tell you; it was the best $20 I ever spent.  This thing works magic. I can get a big bowl of uniform, thin vegetable slices in no time flat.
 I’m not going to say you absolutely have to have a mandoline for this recipe. If you don’t have one, you might just need some crazy knife skills. My attempts at creating crispy vegetable chips with free hand slicing have not been spectacular. I always slice too thick and end up with soft chips. Not what I’m going for here.
 I recommend getting a mandoline. It will save you time and effort and create vegetable slices that bake up to crispy chips like no other. I’ve had mine about a month and we’ve been devouring these on a regular basis.
The recipe below is adaptable. I’ve made it with all beets or all sweet potatoes. I’d love to try other vegetables, too, but haven’t gotten around to it yet. No vegetable is safe, though, now that I’ve gotten my hands on a mandoline.

Crispy baked sweet potato & beet chips
- Total Time: 35 minutes
- Yield: 2 - 4 servings 1x
Description
A healthier chip alternative
Ingredients
- 1-2 beets, peeled and thinly sliced
- 1 large sweet potato, thinly sliced (I don’t bother to peel the sweet potatoes)
- olive oil cooking spray
- sea salt
Instructions
- Preheat your oven to 350 degrees. Generously spray 2-4 baking sheets with the olive oil cooking spray. {If you have a gigantic oven, you can do these all at once. Lucky you. I have to do mine in batches, so I only use two sheets.}
- Place the thin slices on the baking sheet so they are not touching or overlapping.
 Spray the top with the olive oil spray and sprinkle with your desired amount of sea salt. Bake for 10 minutes, then remove the trays and flip the chips over. {I find the easiest way to do this is using a fork to lift the chip off the pan and then flipping the chip over with my fingers.} Bake for another 5-9 minutes. You really just have to watch the chips at the end to catch them at just the right time and not allow them to burn. When they look like they are just starting to brown, they are ready. The timing seems to be different for me each time; it really depends on your oven, the size of your chips, etc.
- When you first pull them out of the oven, they will not feel crispy. Allow them to sit for a minute or so on the pan and they will crisp up. If they don’t, they need another minute or two in the oven. These should be crispy, not soft or soggy at all!
- Continue with the next batch if needed and then…enjoy!

- Prep Time: 15 minutes
- Cook Time: 20 minutes
- Category: Snacks
- Cuisine: American
Nutrition
- Serving Size: 1 of 2 servings
- Calories: 147
- Sugar: 9.5g
- Sodium: 174mg
- Fat: 7g
- Carbohydrates: 19.5g
- Protein: 2g
These crispy vegetable chips have been a big hit around here. If you have a toddler or big kid who is reluctant to eat a ton of veggies, but loves crispy chips and crackers, give these a try. If you don’t have kids, but just want more ways to love on veggies, give these a try. If you don’t have kids and don’t like veggies, I can’t imagine why you are reading this blog, but if you are, give these a try. You just might change your mind about vegetables.
Question: Where do you get your recipe inspiration?


Why do my beets chips not trip up? They burn before they crisp. Even when I take them out of the oven to cool and crisp they stay soft. If I try cooking more they just burn.
I’m sorry to hear this. Mine crisp up great as long as I take them out just before they burn. I can usually tell by looking at them–if they look more dry they will crisp up. If they still look wet they won’t crisp.
I keep trying over and over again and either they are too soggy or burnt! I use a mandala too..
I’m really sorry to hear that! We have made this countless times and they are never soggy. They are easy to burn–they go from perfect to burnt very quickly. You need to take them out before you think they are done and let them crisp up out of the oven (they do crisp up more when they sit for a few minutes.) If they don’t get crispy, you can always put them back in. Sorry you’re having trouble with this one.
I was wondering if this could be done with a dehydrator instead of in the oven?
I don’t see why not!
I dis this with salted and oiled kale leaves. Dropped them in the oven to dry out. Crispy salty goodness.
Mmmm we love kale chips, too! Delicious!
I have read that for zucchini, beet, yam and other veggie chips you have to make them and eat them. They all get soft after a short while. 🙁
I’m gong to try these and then add some curry to Greek yogurt for a dip.
That makes sense. Ours never last anyway! 🙂 Curry with a Greek yogurt dip sounds wonderful!
Maryea,
I just made these chips today and they turned out really well, cripsy. Unfortunately, as they sat around, they became soft again. My question is, do I need to get them in an airtight container as soon as possible after they’re baked to avoid this?
Hmmmm…that’s a good question. We’ve actually eaten these all up right away every time I’ve made them, so I haven’t had the opportunity to test how to store them to get them to stay crispy. I would say try to store them in an airtight container soon after baking, but make sure they are completely cooled first. Sorry about that. 🙁
I also made these in the week by following your recipe, it was crispy and tasted great. As soon as they cooled i put them in a closed container, the next morning they were all soft. I then left them open for the day and by the evening there was no change. So not sure how to store them.
I don’t know of a way to store them to have them stay crisp. We always eat them all in one sitting! Sorry. 🙁
Maryea, my co-worker recently brought in a bag of veggie chips that she had purchased, so I came looking to you for a recipe. Thanks so much. The bag she bought used also carrots and zucchini, as well as sweet potato (my favorite), a root veggie called taro, and beets. I understand peas work as well, so I’ll be moving into these, I’m sure. Your pictures are inspiring and I have a free Saturday! Happy baking!
I love making these homemade chips! I hope you enjoyed them. 🙂
You dont need a mandolin. I just use a run of the mill vegetable peeler to pare the beets…they come out really thin and in no way uniform, but i dont mind it. I didnt want to invest in a mandolin. One like this http://www.amazon.com/Amico-Kitchen-Paring-Stainless-Vegetable/dp/B007VCUDTI
Great idea to use the vegetable peeler! Thanks for letting me know it works, too. 🙂
Just what the doctor ordrdee, thankity you!
It’s great to read something that’s both enjoyable and provides pragmatisdc solutions.
If your articles are always this helpful, “I’ll be back.”
I am experimenting with my mandolin and making veggie chips and I came across your recipe, which I will try but I wonder, because I’ve seen so many recipes, don’t you have to get the excess water out of the veggies before you bake them to make them get crispy? I would really appreciate hearing from you all!
Mine get crispy without getting the excess water out. Let me know if you give it a try!
Mandolins scare the CRAP out of me. The very thought of slicing my fingers sends shivers up my spine like nails on a chalk board! All I can say is USE THE GUARD. Even if you think you can slice carefully without it, don’t try it. You’ll get overly confident and that’s never good with a sharp blade. Even if the guard isn’t holding on all that great to your round vegetable, cut the round end off with a knife and go back to using the guard. Your fingers will thank you!
Oh yes, btw- I’m really excited to make these chips! lol. If I can get myself to use the mandolin again! Maybe I’ll stick with the superbowl guac for now 🙂
R.I.P. Amanda’s fingernail
You sound just like my husband. 🙂 If he’s home, he won’t even let me use it. He insists on doing the slicing. ha ha
Using a spiralizer using the flat blade may help. Only thing is, you’ll have to cut the pieces so you don’t have one large piece of chip garland. lol