I’m not posting about my experiences with homemade bread because I’m a bread expert or even remotely know what I’m doing when it comes to making yeast bread from scratch. I’m a novice at best.
I’m posting about making homemade bread because I know there must be a number of my readers who are in the same boat I’m in: intimidated by homemade yeast bread, yet leery of the ingredients in the store-bought variety.
I am just a regular mom, not a professionally trained baker or even a grandma-trained baker. I’m learning as I go and think if I can do it, anyone can.
So let me share my experiences with you and I hope I can inspire you to try some homemade sandwich bread for your family, too.
There are a number of reasons I want to get into a routine of making our sandwich bread. Back in September I was shopping for bread for Meghan’s birthday party. I hoped to cut costs and get some cheaper loaves than I usually buy, so I was standing in the bread section at the grocery store, reading labels, trying to find an acceptable brand that wasn’t too pricey.
Completely randomly and in what must have been an act of fate, an old man approached me and started chatting to me about bread ingredients. He told me about azodicarbonamide, a chemical found in many store-bought breads that is banned in Europe as a food additive because of its link to asthma.
Sure enough, all of the breads I was looking at had this chemical. The more pricey bread I usually purchase did not, so I stuck with that brand. But just knowing that the kind old man had alerted me to an ingredient that I wasn’t aware of the dangers was alarming. I knew there must be more ingredients lurking in store-bought breads that could be harmful.
Another reason I wanted to start making homemade bread is Luke seems to have a dairy sensitivity, and all the bread I normally buy has milk in it. Cutting out dairy is one thing, but I can’t cut out dairy and bread. Come on. This spurred me to really get going.
So I made it one of my New Year’s goals to start making homemade sandwich bread, but I was intimidated and hadn’t found the right recipe. I knew I wanted the bread to be multi-grain without white flour. (Not purely whole wheat as 100% whole wheat bread is very high on the glycemic index.) Yet it needed to be soft, not too heavy, and not bitter. Tall orders.
When I saw Heidi from Food Doodles post a recipe for whole grain sandwich bread, I was inspired to give it a try. It seemed to be exactly what I was looking for.
I made a few changes to her recipe. First, I wanted to make it dairy-free, so I used almond milk instead of cow’s milk and oil instead of butter. I also used white whole wheat flour instead of the flour from hard wheat her recipe called for.
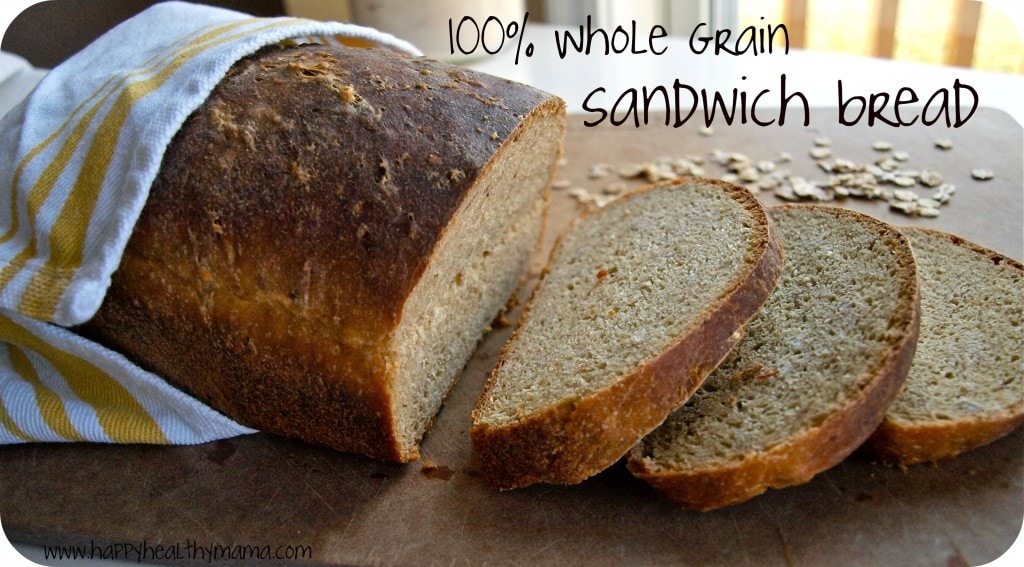
The results were fantastic. It was everything I was hoping for in taste, texture, and density. And while making homemade sandwich bread isn’t exactly a quick process, it isn’t super difficult. I was needlessly intimidated. Like I said, if I can do this, so can you!

New year’s resolution: master homemade sandwich bread
- Total Time: 355 minutes
- Yield: 2 loaves 1x
Description
A beautiful home made bread recipe
Ingredients
- 2 cups almond milk, or milk of choice
- 1 1/3 cup warm water
- 2 1/4 teaspoons active dry yeast, or one package
- 1/4 cup olive oil, or oil of choice
- 1/4 cup honey
- 1 tablespoon + 1 teaspoon salt
- 1 1/4 cup 5-grain hot cereal mix (I used Bob’s Red Mill)
- 1/4 cup vital wheat gluten flour
- 7-8 cups white whole wheat flour
Instructions
- In a small bowl, add 1/3 cup of the water and sprinkle the yeast on top. Set aside for 10 minutes.
- In a large bowl, mix the remaining water, milk, 5-grain cereal mix, 3-4 cups of the flour, and the softened yeast. Once it is mixed, add the gluten flour and mix well. Next, add the oil, honey, and salt. Mix well, and then begin adding the rest of the flour until the dough cannot be easily mixed with a spoon.
- Next you need to knead the dough. I used my brand new stand mixer that I got for Christmas (woo hoo!), but this can also be done by hand. If you are kneading by hand, flour your work surface, turn out the dough, and knead at least 15 minutes. If you are using a stand mixer, knead for 15 minutes on 2. It is ready when the dough is lighter in color, springy, and smooth. It will be tacky to the touch–do not add more flour.
- Add some oil to a large bowl. Transfer the dough to the bowl, turning it over to coat it with the oil. Cover it with a towel and allow it to rise in a warm, draft-free location until it is doubled in size. This can take up to 4 hours depending on how cold your location is.
- At this point, I put the dough in the refrigerator overnight because I learned in a bread-making class that bread tastes best when you do this. It is not necessary, however, and you can simply proceed with the recipe if you prefer.
- Remove the dough from the bowl and knead again to remove all air bubbles and incorporate the oil on the outside of the dough. Cut into two and form into two loaves and place into two buttered or greased loaf pans. Cover and let rise again until the dough is just over the sides of the loaf pans. This should take roughly half the time of the first rise.
- Preheat your oven to 400 degrees. Once it is hot, turn it down to 350 degrees and put in the loaves. Bake for 55 minutes or until the internal temperature reaches 190-200 degrees. Remove from pans and place on cooling racks and cool at least 1-2 hours before slicing.
- Prep Time: 300 minutes
- Cook Time: 55
- Category: Bread
- Cuisine: American
Nutrition
- Serving Size: 1 serving
- Calories: 170
- Sugar: 4.2g
- Sodium: 441mg
- Fat: 4.6g
- Carbohydrates: 29g
- Protein: 5.9g
Thanks for inspiring me and the great recipe, Heidi. I’m looking forward to making this bread again and again as not only do I love it, but it’s also husband and toddler approved.
Getting back on a regular posting schedule is going to take some time as I adjust to life with two little ones. They are definitely keeping me busy.
 Thanks to everyone for hanging in there in the meantime!
Question: Do you make homemade sandwich bread? If you have a favorite recipe, please feel free to leave it in the comment section (or a link)!


A new year is a time for resolutions, right? Perhaps we should be cooking the greatest sandwiches in the world, or that we should be travelling around the world as roving chefs? Whatever the case may be, resolutions can be made to change for the better.
Hi. I would love to make me own bread. I have a 22 month old who loves PB&J. Bread is so expensive in the store!! How long would yo say the bread would last? How do you store it? My husband likes putting them in the fridge but I know people that keep them on the counter as well. Have you tried freezing yet? Thanks!
Yes, freezing works great! It doesn’t last that long fresh. 2-3 days.
Be aware that kneading bread in a mixer that isnt cut out to knead bread will only end in disaster. My Kitchen Aid stand mixer started smoking while making this recipe. Unfortunately, this was a pricey loaf of bread.
Why is a Kitchen Aid stand mixer not cut out of knead bread?
Hi Maryea! I have been enjoying trying MANY of your recipes. I have a 16-month-old, so I love to read about your adventures in toddler mealtime. I tried this bread yesterday and it didn’t rise at all.. My yeast is pretty new, so I don’t think that’s the problem. I didn’t use “white” whole wheat flour…I ground my own flour (vitamix dry container) from hard red wheat berries. Could that be the issue? I ended up using about 7 cups of flour. The dough was so dense and heavy that I couldn’t finish kneading it in the kitchen aid mixer and kneaded it by hand instead. After refrigerating it overnight, it was a solid mass of heavy, rubbery dough. I couldn’t really work with it, so I ended up rolling it out with a rolling pin enough to be able to just roll it up into a loaf shape. It tastes fine, it’s just so dense. I would love any input as to where I went wrong! I thought maybe it was because I used vital wheat gluten instead of vital wheat gluten FLOUR, but I saw your previous comment that those are the same product. Thanks for any advice!!
Hmmm…I wish I had a definitive answer for you. It could have been the flour, but I’m not that familiar with the exact properties of hard red wheat berries. From what I understand, white and red wheat is very similar. I have heard there is a difference in the protein between winter red wheat and spring red wheat, though, so the protein level could have affected things. I’m sorry I can’t give you a better answer!
By the way, vitamin c (ascorbic acid) is a great natural dough conditioner and natural preservative. Grind up a couple vit c pills in a ziploc bag with a rolling pin and store in an airtight container. Use a small pinch – only very very tiny amounts are needed. It’s great especially for whole grain breads. Just make sure you use pure vit c with no additives and no flavorings.
Wow! Very cool. Thanks again.
That looks ridiculously good for a first attempt. I’m jealous. I got lucky and have a grandfather who I grew up close to baking potato bread practically constantly. I don’t think I had more than a single loaf of store bought total until they moved out of state! But I never tried making my own til I had kids. (My first loaves did not look that pretty. They were bricks. So sad.) Thankfully I’m stubborn as a mule and discovered bread is not intimidating at all. Five years later I can now – literally – throw heaps of ingredients into my stand mixer by eyeball and churn out just about anything I want. I still mess up on rare occasion, but nothing beats homemade bread, so I just chuck it and start over. My few tips: packets of yeast get expensive, so try to buy instant yeast in 1lb packages. Store it in the freezer and it will literally last years. It does not need to be mixed with warm water and “proofed” just toss it in with your flour and mix away. Sub 1:1 for active dry. Want a softer loaf? Add fat. Eggs, milk, oil, butter, etc. Nonfat dry milk (despite the nonfat moniquer) works perfectly and stores well. Nut milks work just fine too, just remember to cut back your water if you add liquids. Dough is forgiving as anything. Too wet? Add flour a tablespoon at a time til it’s right. Dry? Add liquid. Forgot the salt? No problem. Toss it on your counter, pat it out as flat as you can (gently) and sprinkle salt on. Roll up and knead for a few minutes. The baking fairies will forgive you. I speak from (unfortunate) experience.
Brianna-thank you so so much for sharing your tips and experiences! These are such a big help!
I have a bread maker can I do any of the steps using it?
I’m sorry; I don’t know. I have no experience with a bread maker!
I wanted to let you know that I have one loaf on the counter and one in the oven. I anxiously waited an hour before slicing into it because I HAD to know how it came out. It is AMAZING! I was looking for a way to make my own bread that was whole wheat, dairy free and high in protein. I have a fiance who is training for an Ironman and we are eating vegan for the month to make us aware of our eating habits, get us focused on whole-foods and to limit our meat intake in the future. It has been a learning experience to get a very high amount of protein into his daily diet. I was a bit scared of making my first yeast based bread especially without a stand mixer. Your recipe and instructions were great! I will, without a doubt, be making this again and again. Thanks a million times over!
You’re welcome! Good luck with your month of vegan eating. We did that a few years back, and it was definitely challenging, but a great experience. It really forced me to broaden my cooking repertoire and ever since then I’ve eaten a much more plant-based diet. It was a perfect springboard for us to have a diet that was more focused on plant-based foods. I can imagine it must be a challenge to get a good amount of protein into your fiance’s diet. Have you read Thrive by Brenden Brazier? You should check it out if you haven’t–it’s a great nutritional resource for vegan athletes.
I’m glad the bread turned out well for you! I think it feels so good to make a delicious bread with just a few simple ingredients.
Thank you SO SO much for this! There have been so many times where i’ve stood in the bread aisle reading ingredients and people stop and look at me funny. I read somewhere that bread should not have more than 7 ingredients in it (all of which you can pronounce) and it is hard to find. I did find one that I like, but it is so over priced…..I can’t wait to try this homeade bread! and Thank you for all your recipes, you make me feel like i’m not alone in my search for making my family healthy and happy!!
Thank YOU for this comment! I often feel the same way, and this blog really helps me realize that there are other moms out there looking for healthier options for their families.
Homemade bread is something I too wanted to start with the new year. Most impressive that you took on this task with a newborn in your house. You are awesome. I want to try your recipe, but I’m having trouble finding vital wheat gluton flour. Any suggestions?
Have you checked your health food store? I get mine at Health Foods, Unlimited.
Just curious–what is vital wheat gluten flour? And where to find it? Will it say exactly that on the package? THanks for the recipe! I’m excited to try it!
It will either say “vital wheat gluten flour” or just “vital wheat gluten”. I get mine at a local health food store (Health Foods, Unlimited). Here’s a link to the kind I have: http://www.bobsredmill.com/vital-wheat-gluten.html
I hope you are able to find some!